switek email

sales06@switek.biz

switek whatsapp

+86 186 5927 5869

Subscript to Us

.
SWITEK Robotic Arms for Injection Molding Machine Installation Instruction -- Chapter 2: Installation Safety

Injection Robotic Arm

One Stop Robotic Arms for Injection Molding Machine Purchasing

SWITEK Robotic Arms for Injection Molding Machine Installation Instruction -- Chapter 2: Installation Safety
Abstract

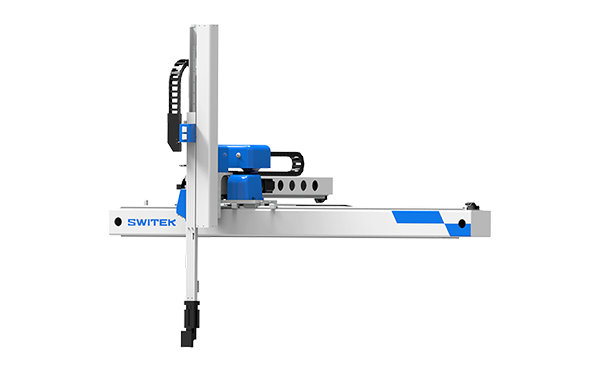
A robotic arm is installed to the top of the injection molding machine, it'll either working in a fast running situation or with heavy loading. Any isnorance to the safety of the robotic arm installation will result in a disaster with serious injury or even death to your staff. Here in this chapter we'll discuss the warning signs and its meaning of the robotic arm for the safer operating of the robotic arm.

2.1 Safety Instruction

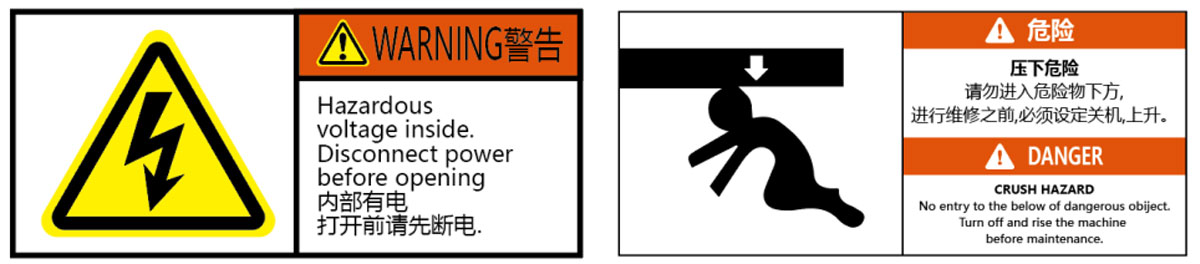
DANGER LEVEL SIGN: The safety precautions recorded in this manual are divided into the following three categories. When the danger level is high, please be especially careful.

robot alarm
Failture to observe this precaution may lead to death or serious injury.
robot alarm
Failure to observe this precaution may easily result in death or serious injury, or cause serious damage to the machine.
robot alarm
Failutre to observe this precaution may result in personal injury or serious damage to the machine

2.2 Safety Rules
2.2.1 General Safety Rules
  1. Get to know your machine for your persional saety, read this manual carefully.

    Familiar with machine applications and limitation, as well as potential hazards associated with machines.

  2. Kepp the working area clean:

    Cluttered areas and workbenches can cause surprises.

  3. Do not use a robotic arm in dangerous environments:

    Do not use the robot in wet or rainy locations

  4. Keep children away from the robotic arms working area:

    All visitors must maintain a safe distance within the work area. Factories must keep children out of the robotic hands.

  5. Do not forcibly operate the machine

    Have the robot working safely at the designed speed and within the moving stroke.

  6. Debug the mainpulator with the correct tool.
  7. Wear the appropriate clothing

    Avoid wearing or waearing loose closing, gloves, necklaces, bracelets or jewelry that could be caught in moving parts. Non-slip shoes are recommended. Wear a cap to cover long hair.

  8. Servicing the machine in the end condition:

    Follow the lubrication and maintenance instructions and clean the machine regularly to prolong the life of the robot.

  9. Before maintenance, replacement of parts, or assembly and reassembly of the motor, the main power and air supply of the robot must be cut off.
  10. Use the recommended accessories, check the recommended accessories in the manual.
2.2.2 Additional safety rules for robotic arms
robot warning Indicates that failure to follow the advice will result in serious injury or death.
  1. Electrical Safety
    • It's a position with high voltage, and it is forbidden to touch it when the power is turned on.
    • Failure to follow this advice will result in elecdtric shock, electric shock, burns or death.
    • It's forbidden to run with the electric control box open.
    • During maintenance, the work con only be carried out after the main power supply is cut off.
  2. Prohibited Conditions of Use
    • Environment with flammable gas and liquid
    • An environment where conductive objects such as metal chips after metal processing are scattered
    • There are environments with corrosive gases such as acids and alkalis
    • There is a foggy environment caused by the coolant used for cutting and grinding
    • There are large inverters, high-power output high-frequency transmitters, large conductors, welders and other electrical interference sources nearby.
    • There is a temperature environment outside the range of 0~40°C during work
    • There is an environment with humidity exceeding 90%RH.
    • There is an environment where moisture condensation occurs.
  3. Prohibited Matters
    • The behavior warned in the warning sign
    • Acts prohibited in the operation manual
    • Tear up warning signs
    • Operate in a state without normal judgement due to dringking, taking medicine, and being ill
    • Operation under intermittent power failure caused by thunder, lightning and other reasons
    • Modification of machinery and equipment without the permission of the company
  4. Requirements for Use

    Enterprises using industrial automation machinery should follow the established "Technical Guidelines for Safety Standards for the Use of Industrial Automation Machinery" to formulate precautions for selection, installation, use, etc., and to prevent industrial accidents. Necessary measures for industrial disasters.

  5. System Grounding
    • In order to make the operating system operate stably and normally, the power grounding (the third grounding) of the system must be reliable grounding, so as to effectively prevent various malfunctions causeed by leakage voltage or static electricity of the system.
    • Please make sure to ground the servo drivers and servo motors.
    • To prevent electric shock, be sure to connect the protective grounding terminal of the servo drive and the control board.
  6. Precautions
    • The maintenance, maintenance and overhaul of the manipulator must be performed by professionally trained personnel.
    • There must be safety protection devices in the working area of the manipulator to avoid harm to the human body.
    • All electrical wiring of the manipulator must be done by professionals, and wired acccording to the specified specifications and instructions.
    • Necessary warning signs are attached to the manipulator to eliminate residual danger. Please pay attention to the warning signs during operation.
    • The handling of the manipulator must comply with the provisions of the safety rules.
    • All operations, adjustments and controls must follow the instructions in the manual.
    • When someone is in the dangerous area, the manipulator connot be operated.
    • The hand controller must be fixed outside the dangerous area, and the operator must stand outside the dangerous area.
    • When the manipulator is repairing or changing the mold calibration machine, the power supply must be turned off and the air source must be unplugged.
    • The manipulator has the function of automatic error detection, and the user should contact the agent or the company according to the fault description. Do not make changes unless you have received professional training.
    • In addition to the proximity switch, suction detection, bad clips, and solenoid valve faults that can be repaired by yourself, notify the agent or our company.
2.3 Safety Guard
robotic arm safety guard
robot warning
The minimum (safe) distance from the safety guard or any danger to the guard shall comply with the provisions of 5.10 in GB 11291.2-2013
2.4 Warning Signs
robot warning signs
2.5 Machine Nameplate
robot name plate

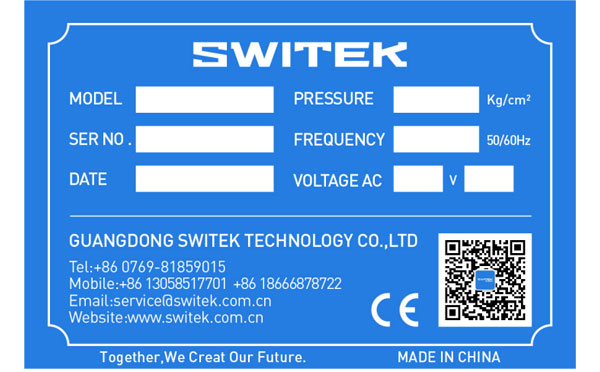
Δ Please carefully check the nonformity between the nameplate and the robot itself, so that the corresponding machine file can be found according to the nameplate information during maintenance!


Hybrid Injection Molding Machine for Laboratory Consumable Petri Dish Injection Molding -- HD100LDY
Haida hybrid Injection Molding Machine
HD100LDY

HD100LDY -- HaiDa Hybrid Injection Molding Machine

No. Name Value
1 Clamping Force 1000 kN
2 Shot Weight 55 g
3 Shot Speed 200 mm/s
4 Screw Diameter 26 mm
5 Opening Stroke 330 mm
6 Space Between Tie Bars 370 x 370 mm
7 Mold Thickness (Min) 140 mm
8 Mold Thickness (Max) 380 mm
9 Pumper Motor 34 kW
10 Heating Capacity 5 kW

Injection Automation Application -- Side Entry Petri Dishs Injection Molding Automation Solution
petri dish packing solution

SIDE ENTRY PETRI DISH PACKING SOLUTION

Introduction of SWITEK Side Entry Petri Dish Packing System

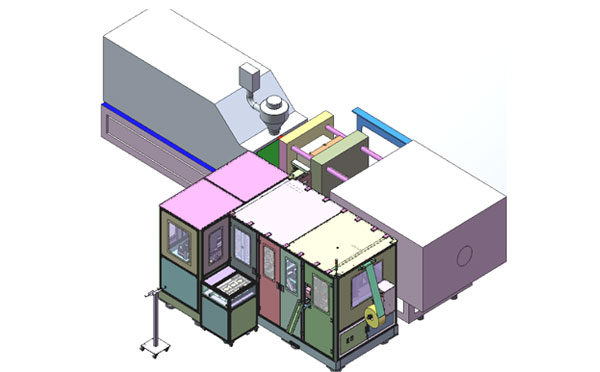
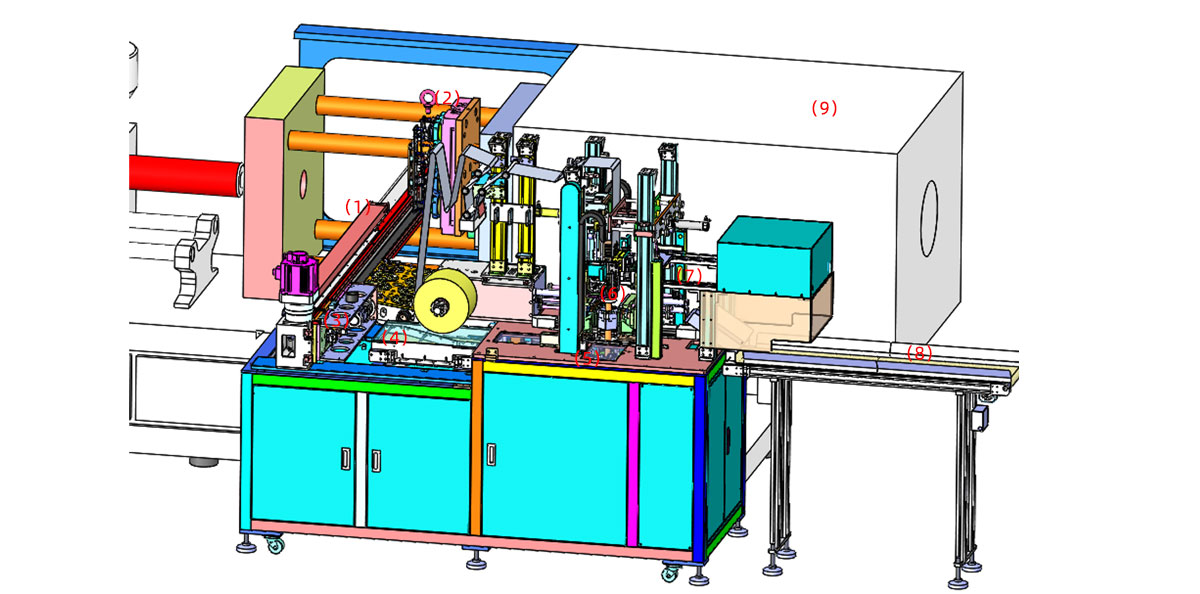
The SWITEK side entry petri dish packing system is a custom made automation system for the stable production of laboratory consumable plastic petri dish with the picking robot, the petri dish assembly, stacking, packing unit etc. integrated as auniformed system for the efficient and stable production of the petri dish. The system can be custome made for a petri dish mold layout design of 2+2, 4+4, 6+6, 8+8 etc.
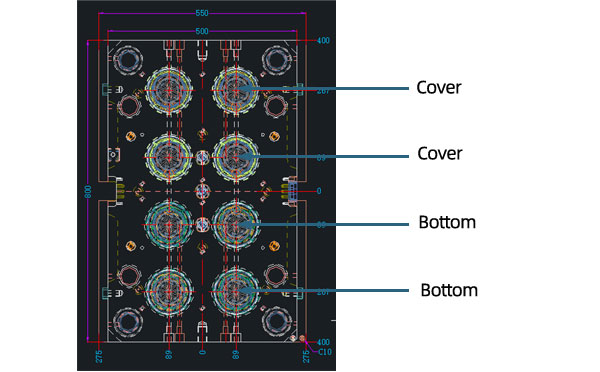
Functional Units of SWITEK Top Entry Petri Dish Packing System
petri dish packing solution
  • (1) -- Side Entry Robotic Arm: The picking arm of the packing system in handling the picking of the petri dish from the injection molding machine and place them on the assembly unit.
  • (2) -- Injection Mold: The core injection unit to shape the petri dish, it can be 2+2, 4+4, 6+6, 8+8 configuragion of the petri covers and bottoms.
  • (3) -- Petri Dish Assembly Unit: Have the cover and bottom of the petri dish assembled and drop it on the conveyor.
  • (4) -- Sorting Conveyor: Lined the assembled petri dish sets for stacking before packing.
  • (5) -- Stacking Station: Have the well assembled petri dishes stacked up as requested (5/10/15/20/25 sets etc.).
  • (6) -- Petri Dish Packing Unit: Have the well stacked petri dish packed and sealed with optional function of vacuume the bag.
  • (7) -- Petri Dish Transfer Robot: Catch the well sealed petri dish bag and drop it to the conveyor.
  • (8) -- Petri Dish Dropping Conveyor: Deliver the well packed petri dish.
  • (9) -- Injection Molding Machine: The injection unit of the whole syste.

Installation Dimension of SWITEK Side Entry Petri Dish Packing System
petri dish packing solution

Productivity of SWITEK Side Entry Petri Dish Packing Solutions
    Vacuumed Sleeve Packing
  • 10 Sets/Bag --Injection Cycle time: 9s
  • 20 Sets/Bag --Injection cycle: 6s
  • 25 Sets/Bag --Injection Cycle: 5.5s
    Non-vacuumed Sleeve Packing
  • 10 Sets/Bag --Injection Cycle time: 6.5s
  • 20 Sets/Bag --Injection cycle: 6s
  • 25 Sets/Bag --Injection Cycle: 5.5s

Mold Layout Design & Sleeve Size for the Petri Dish Packing System
petri dish packing solution

Mold Layout Deisgn

petri dish packing solution

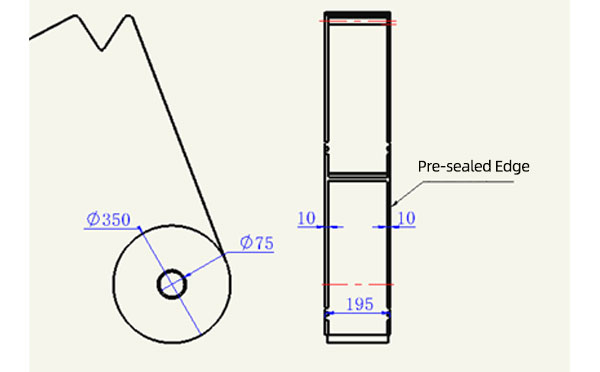
Sleeve Size for Package with Vacuum Request

petri dish packing solution

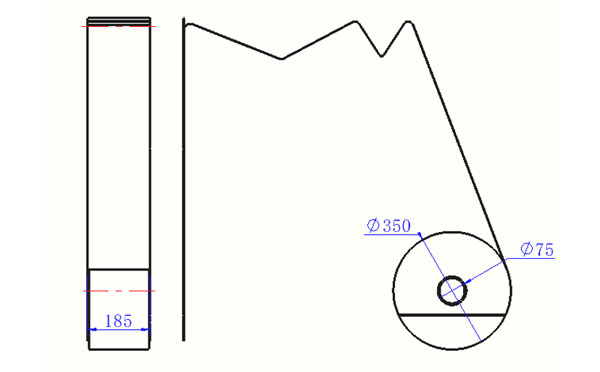
Sleeve Size for Package without Vacuum Request

petri dish packing solution

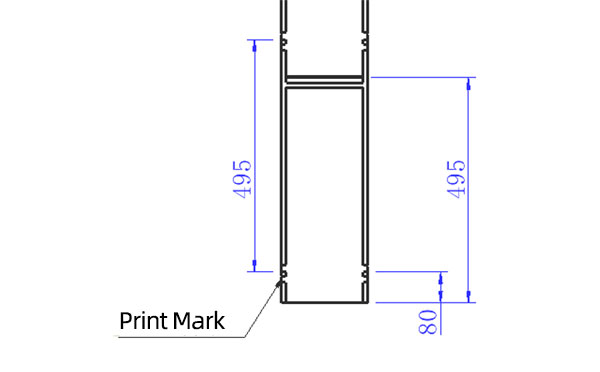
Sleeve (With Mark) Size for Package with Vacuum Request

petri dish packing solution

Sleeve (With Mark) Size for Package without Vacuum Request

I think you'll have an overall understanding about the SWITEK top/side entry petri dish packing system. If you still have any other question about it or need any help in your petri dish production project, please feel free to contact SWITEK laboratory consumable plastic parts injection molding solutions team for more information.


Email: sales06@switek.biz

WhatsApp

WeChat


Request for Quotation Now
Submit