
sales06@switek.biz

+86 186 5927 5869

Subscript to Us
sales06@switek.biz
+86 186 5927 5869
Subscript to Us
Keywords:Panasonic A6 Servo Installation Instruction, Panasonic A6 Driver, Panasonic A6 Series Servo Motor Manual
Control output signal of desired function can be assigned to I/F connector. Logic of the output pin cannot be changed.
| Applicable parameter | Default parameter setting (): decimal notation | Default Setup | ||||||
|---|---|---|---|---|---|---|---|---|
| Position/Full-closed control | Verocity control | Torque control | ||||||
| Signal | Signal | Signal | ||||||
| Pin No. | 10 11 | Title of signal | SO1 output | Pr4.10 | 00030303h(197379) | BRK-OFF | BRK-OFF | BRK-OFF |
| Symbol | Pin No.10:SO1- Pin No.11:SO1+ | |||||||
| Pin No. | 34 35 | Title of signal | SO2 output | Pr4.11 | 00020202h(131586) | S-RDY | S-RDY | S-RDY |
| Symbol | Pin No.34:SO2- Pin No.35:SO2+ | |||||||
| Pin No. | 36 37 | Title of signal | SO3 output | Pr4.12 | 00010101h(65793) | ALM | ALM | ALM |
| Symbol | Pin No.36:SO3- Pin No.37:SO3+ | |||||||
| Pin No. | 38 39 | Title of signal | SO4 output | Pr4.13 | 00050504h(328964) | INP | AT-SPEED | AT-SPEED |
| Symbol | Pin No.38:SO4- Pin No.39:SO4+ | |||||||
| Pin No. | 12 | Title signal | SO5 output | Pr4.14 | 00070707h(460551) | ZSP | ZSP | ZSP |
| Symbol | SO5 | |||||||
| Pin No. | 40 | Title of signal | SO6 output | Pr4.15 | 00060606h(394758) | TLC | TLC | TLC |
| Symbol | SO6 | |||||||
Note → • The function is changed by the setting of parameter. For details, refer to P.4-39. See "Functions assignable to control output" as shown below. [—]: No function assigned. P.3-56 | ||||||||
| Title of signal | Servo-Alarm output | Related control mode | P | S | T | F | ||
| Symbol | ALM | Default assignment | 36,37 (SO3) | I/F circuit | P.3-35 | |||
| ||||||||
| Title of signal | Servo-Ready output | Related control mode | P | S | T | F | ||
| Symbol | S-RDY | Default assignment | 34,35 (SO2) | I/F circuit | P.3-35 | |||
| ||||||||
| Title of signal | External brake release signal | Related control mode | P | S | T | F | ||
| Symbol | BRK-OFF | Default assignment | 10,11 (SO1) | I/F circuit | P.3-35 | |||
| ||||||||
| Title of signal | Positioning complete | Related control mode | P | S | T | F | ||
| Symbol | INP | Default assignment | 38,39 (SO4) | I/F circuit | P.3-35 | |||
| Title of signal | Positioning complete 2 | Related control mode | P | S | T | F | ||
| Symbol | INP2 | Default assignment | — | I/F circuit | P.3-35 | |||
| ||||||||
| Title of signal | Speed arrival output | Related control mode | P | S | T | F | ||
| Symbol | AT-SPEED | Default assignment | 38,39 (SO4) | I/F circuit | P.3-35 | |||
| ||||||||
| Title of signal | Torque in-limit signal output | Related control mode | P | S | T | F | ||
| Symbol | TLC | Default assignment | 40 (SO6) | I/F circuit | P.3-35 | |||
| ||||||||
| Title of signal | Zero-speed detection output signal | Related control mode | P | S | T | F | ||
| Symbol | ZSP | Default assignment | 12 (SO5) | I/F circuit | p.3-35 | |||
| ||||||||
| Title of signal | Speed coincidence output | Related control mode | P | S | T | F | ||
| Symbol | V-COIN | Default assignment | — | I/F circuit | P.3-35 | |||
| ||||||||
| Title of signal | Alarm output 1 | Related control mode | P | S | T | F | ||
| Symbol | WARN1 | Default assignment | — | I/F circuit | P.3-35 | |||
| ||||||||
| Title of signal | Alarm output 2 | Related control mode | P | S | T | F | ||
| Symbol | WARN2 | Default assignment | — | I/F circuit | p.3-35 | |||
| ||||||||
| Alarm No. | Alarm | Content | Pr6.27*1 | Pr4.40/Pr4.41*2 | Pr6.38 Corresponding bit *3 |
|---|---|---|---|---|---|
| A0 | Overload protection | Load factor is 85% or more the protection level. | ○ | 1 | bit7 |
| A1 | Over-regeneration alarm | Regenerative load factor is 85% or more the protection level. | ○ | 2 | bit5 |
| A2 | Battery alarm | Battery voltage is 3.2V or lower. | Fixed at no time limit. | 3 | bit0 |
| A3 | Fan alarm | Fan has stopped for 1 sec.*4 | ○ | 4 | bit6 |
| A4 | Encoder communication alarm | The number of successive encoder communication errors exceeds the specified value. | ○ | 5 | bit4 |
| A5 | Encoder overheat alarm | The encoder detects overheat alarm. | ○ | 6 | bit3 |
| A6 | Oscillation detection alarm | Oscillation or vibration is detected. | ○ | 7 | bit9 |
| A7 | Lifetime detection alarm | The life expectancy of capacity or fan becomes shorter than the specified time. | Fixed at no time limit. | 8 | bit2 |
| A8 | External scale error alarm | The feedback scale detects the alarm. | ○ | 9 | bit8 |
| A9 | External scale communication alarm | The number of successive feedback scale communication errors exceeds the specified value. | ○ | 10 | bit10 |
| AC | Deterioration diagnosis warning *5 | Load characteristic estimates and torque command under constant speed has exceeded the set range. | ○ | 22 | bit7 |
| C3 | Main power off warning | In case that Pr7.14 (Detection time of main power off warning) is 10 to 1999, the mains power between L1 and L3 has stopped instantaneously for more than the time prescribed in Pr7.14. | ○ | 14 | bit14 |
*1 The "○" means that a time in the range 1s to 10s or no time can be selected through Pr6.27 "Warning latching time". Note that the battery warning and the end of life warning have no time limit.
*2 Select the warning output signal 1 (WARN1) or warning output signal 2 (WARN2) through Pr4.40 "Warning output select 1" or Pr4.41 "Warning output select 2". When the set value is 0, all warnings are ORed before being output. Do not set to any value other than those specified in the table above.
*3 A warning detection can be masked by Pr6.38 "Warning mask setup" Corresponding bits are shown in the table. Warning is masked with bit = 1.
*4 The upper fan on the H-frame driver stops during servo OFF to save energy. This is normal and no fan alarm is displayed.
*5 Invalidated when Pr6.97 "Function expansion setting 3" bit1 = 0.
| Pin No. | — | Title of signal | Deterioration diagnosis velocity output | Related control mode | P | S | T | F |
| Symbol | V-DIAG | I/F circuit | P.3-36 | |||||
| ||||||||
| Pin No. | — | Title of signal | Position compare output | Related control mode | P | S | T | F |
| Symbol | CMP-OUT | I/F circuit | P.3-36 | |||||
| •The output transistor is turned ON when the actual position has passed the position set by the parameter. Setting for all control modes is required when using the position compare output, (CMP-OUT). In case setting is made only to one or two control modes, Err33.4 "Output function number error 1 protection" or Err33.5 "Output function number error 2 protection" will occur. | ||||||||
| Pin No. | 42 | Title of signal | Analog monitor output 2 | Related control mode | P | S | T | F |
| Symbol | IM | I/F circuit | P.3-36 | |||||
| ||||||||
| Pin No. | 43 | Analog monitor output 1 | Related control mode | P | S | T | F | |
| Symbol | SP | I/F circuit | P.3-36 | |||||
| ||||||||
| Pin No. | 13, 15 17, 25 | Title of signal | Signal ground | Related control mode | P | S | T | F |
| Symbol | GND | I/F circuit | — | |||||
| ||||||||
| Pin No. | 50 | Title of signal | Frame ground | Related control mode | P | S | T | F |
| Symbol | FG | I/F circuit | — | |||||
| ||||||||
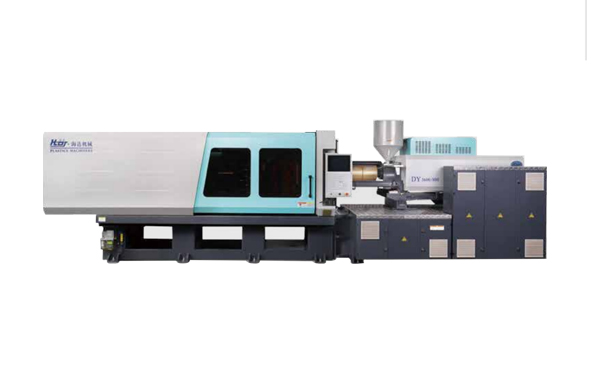
HD130LDY -- HaiDa Hybrid Injection Molding Machine
| No. | Name | Value |
|---|---|---|
| 1 | Clamping Force | 1300 kN |
| 2 | Shot Weight | 122 g |
| 3 | Shot Speed | 200 mm/s |
| 4 | Screw Diameter | 32 mm |
| 5 | Opening Stroke | 380 mm |
| 6 | Space Between Tie Bars | 420 x 420 mm |
| 7 | Mold Thickness (Min) | 150 mm |
| 8 | Mold Thickness (Max) | 450 mm |
| 9 | Pumper Motor | 49 kW |
| 10 | Heating Capacity | 7.5 kW |
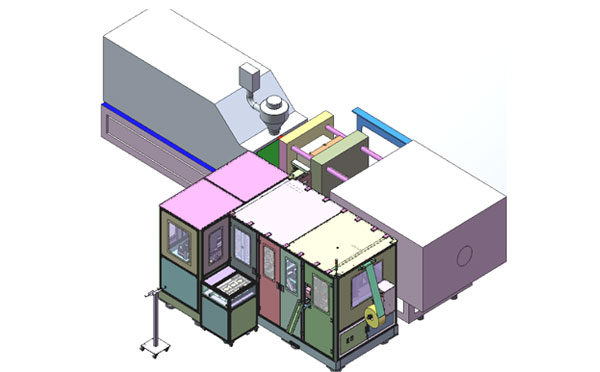
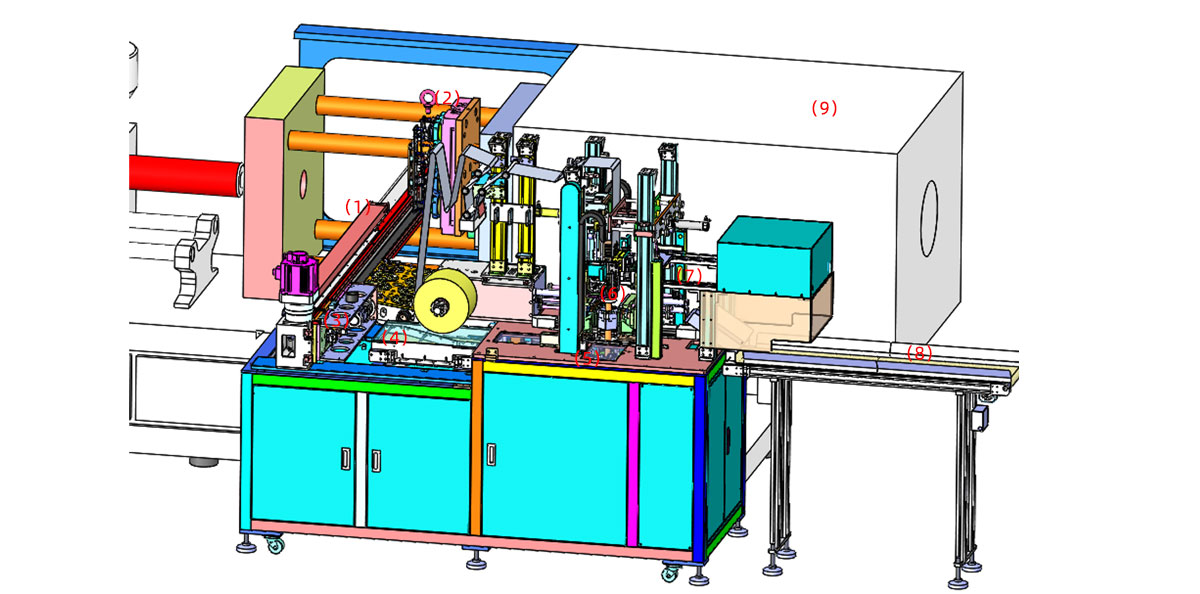
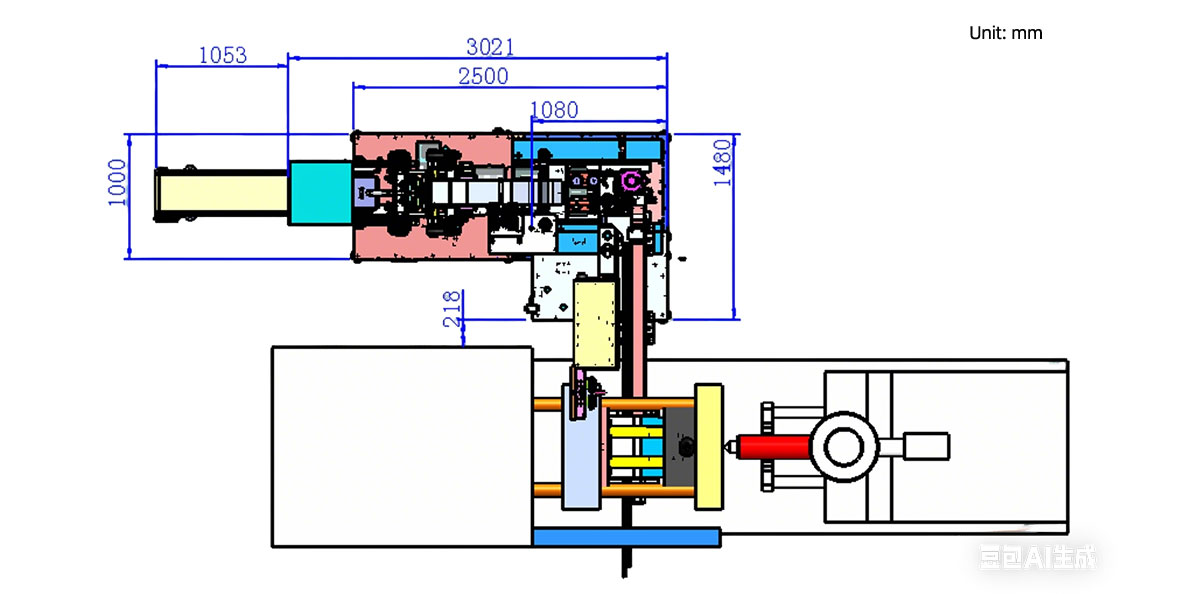
The SWITEK side entry petri dish packing system is a custom made automation system for the stable production of laboratory consumable plastic petri dish with the picking robot, the petri dish assembly, stacking, packing unit etc. integrated as auniformed system for the efficient and stable production of the petri dish. The system can be custome made for a petri dish mold layout design of 2+2, 4+4, 6+6, 8+8 etc.
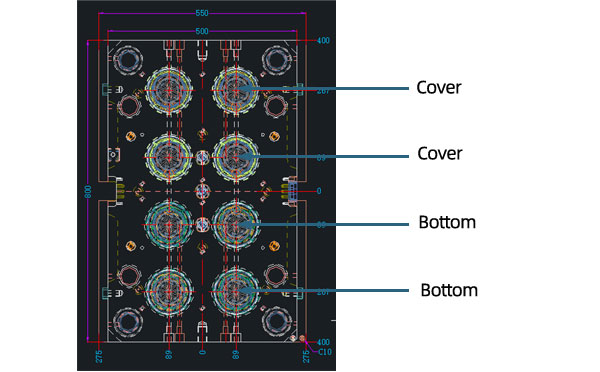
Mold Layout Deisgn
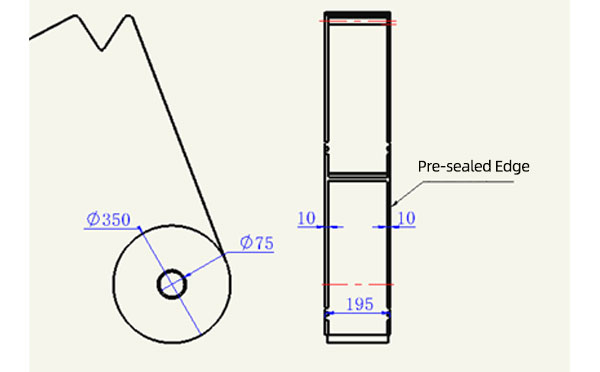
Sleeve Size for Package with Vacuum Request
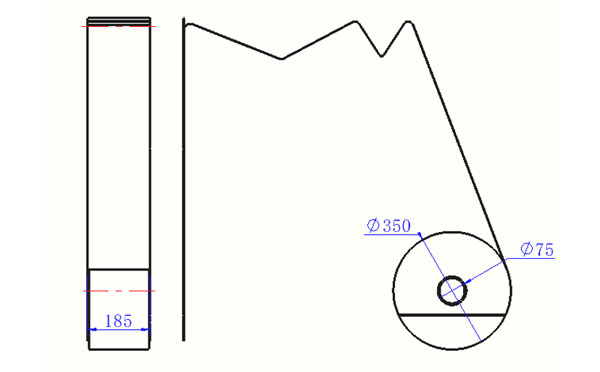
Sleeve Size for Package without Vacuum Request
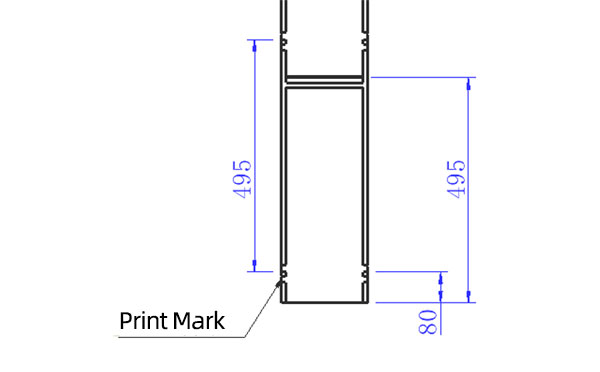
Sleeve (With Mark) Size for Package with Vacuum Request

Sleeve (With Mark) Size for Package without Vacuum Request
I think you'll have an overall understanding about the SWITEK top/side entry petri dish packing system. If you still have any other question about it or need any help in your petri dish production project, please feel free to contact SWITEK laboratory consumable plastic parts injection molding solutions team for more information.
HuangYanZheng©Copy Right


